Enable or disable PHP extensions in Select PHP Version from cPanel
When you install Moodle, Joomla, WordPress, or another PHP application on your shared hosting, the installer may warn you that an extension is missing: intl, zip, mbstring, mysqli, imagick, gd, or fileinfo. You can review and enable extensions from cPanel without SSH or root access.
In this guide you will use cPanel’s Select PHP Version tool. Inside the tool, cPanel/CloudLinux shows the PHP Selector screen and the Account PHP Settings section.
Before you start
- Identify the exact extension name your application requires; for example,
intl. - Confirm which PHP version your domain uses. Extensions are enabled per PHP version.
- Make a backup beforehand if you are changing a live site.
- If your account shows a
nativePHP version, cPanel may block module changes. In that case, select an available PHP version that is not marked asnativeand confirm with Apply only if you need to manage extensions for that version.
Steps to enable a PHP extension
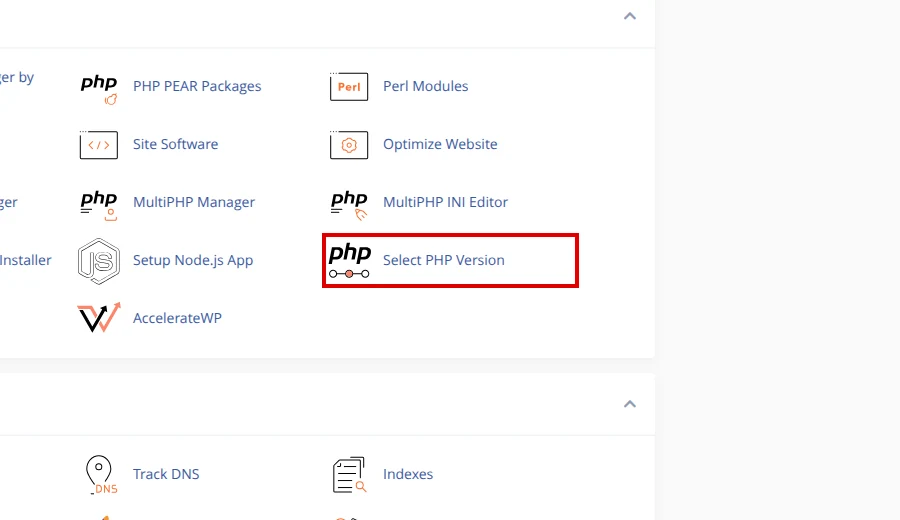
1. Open Select PHP Version in cPanel
- Log in to your cPanel.
- In the search bar, type
PHP. - Click Select PHP Version. If you do not see this option, contact support to confirm whether your plan includes it.
2. Verify the active PHP version
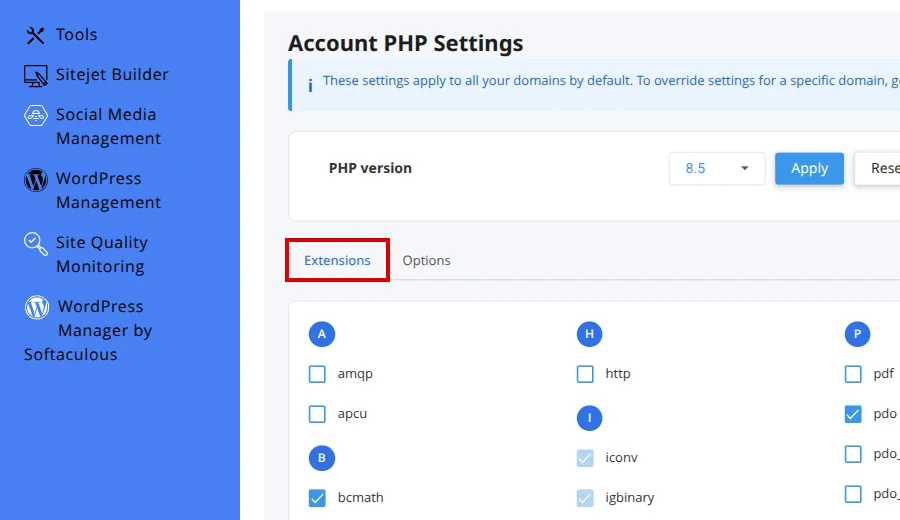
- In Account PHP Settings, check the PHP version field.
- If you see a
nativeversion warning, change to an editable PHP version from the dropdown and use Apply to confirm the version change. - If you only need to change the PHP version for a domain, first review our guide on Change the PHP version with MultiPHP Manager .
3. Enable the extensions you need
- Open the Extensions tab.
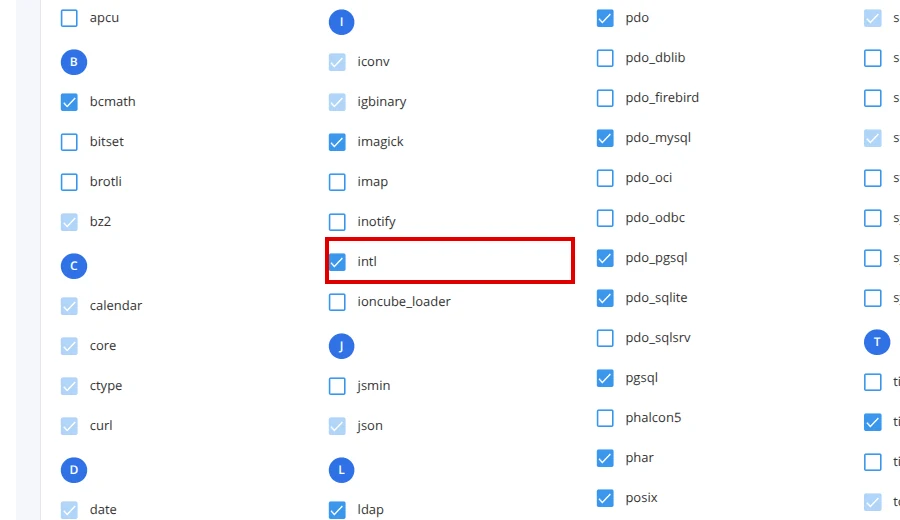
- Look in the list for the extension your application reports, for example
intl,zip,mbstring,mysqli,gd, orfileinfo. - Check the box to the left of the extension name.
- If the Apply button appears, click it to save the changes. Some accounts apply changes when you tick the box; others show the button for confirmation.
Tip: enable only the extensions your application actually requires. Turning on unnecessary extensions can increase memory usage and the load on your account.
4. Test your site or run the installer again
- Reload the installer page or the admin panel.
- Confirm that the warning has disappeared.
- If the application was already installed, open the site and test the function that was failing, such as uploading a ZIP file, generating images, or connecting to the database.
Final verification
- The extension appears checked in Extensions inside PHP Selector.
- The installer or application panel no longer shows the missing extension warning.
- The site loads without 500 errors or PHP messages on screen.
- The feature that depended on the extension works correctly.
Common errors
- Select PHP Version is not available: your plan may not include it, or the icon may appear under a different name. Contact support.
- The native version does not allow changes: select an available PHP version that is not marked as
native, then confirm with Apply. - The extension is not in the list: not all extensions are available in every PHP version. Try another supported version or ask support for help.
- I enabled the extension but the error continues: confirm that you are working on the same PHP version your domain uses in MultiPHP Manager.
- The site started showing a 500 error after the changes: disable the last extension you enabled and review the guide to Solve error 500 after modifying your website .
- A 508 or resource error appears: check your account usage with Check Resource Usage in cPanel when error 508 appears .
Recommended reading
Still need help?
If this guide didn’t solve your issue, our team can help you via ticket.